21 KiB
| jupytext | kernelspec | ||||||||||||||||||
|---|---|---|---|---|---|---|---|---|---|---|---|---|---|---|---|---|---|---|---|
|
|
(serve-deployment-graph)=
Deployment Graph
Note: This feature is in Alpha, so APIs are subject to change.
Motivation
Machine learning serving systems are getting longer and wider. They often consist of many models to make a single prediction. This is common in use cases like image / video content classification and tagging, fraud detection pipeline with multiple policies, multi-stage ranking and recommendation, etc.
Meanwhile, the size of a model is also growing beyond the memory limit of a single machine due to the exponentially growing number of parameters. GPT-3 and sparse feature embeddings in large recommendation models are two prime examples.
Ray has unique strengths suited to distributed inference pipelines: flexible scheduling, efficient communication, and shared memory. Ray Serve leverages these strengths to build inference graphs, enabling users to develop complex ML applications locally and then deploy them to production with dynamic scaling and lightweight updates (e.g., for model weights).
Features
- Provide the ability to build, test, and deploy a complex inference graph of deployments both locally and on remote cluster. The authoring experience is fully Python-programmable and support dynamic control flow and custom business logic, all without writing YAML.
- In production, the deployments making up the graph can be reconfigured and scaled dynamically. This should enable DevOps/MLOps teams to operate deployment graphs without modifying the underlying code.
Full Ray Enhancement Proposal, REP-001: Serve Pipeline
+++
Concepts
-
Deployment: Scalable, upgradeable group of actors managed by Ray Serve. See docs for detail
-
DeploymentNode: Smallest unit in a graph, created by calling
.bind()on a serve decorated class or function, backed by a Deployment. -
InputNode: A special node that represents the input passed to a graph at runtime.
-
Deployment Graph: Collection of deployment nodes bound together to define an inference graph. The graph can be deployed behind an HTTP endpoint and reconfigured/scaled dynamically.
+++
Full End to End Example Walkthrough
Let's put the concepts together and incrementally build a runnable DAG example highlighting the following features:
At the end of this document we have the full and end to end executable implementation.
- Building a graph:
- A deployment node is created from
@serve.deploymentdecorated function or class. - You can construct different deployment nodes from same class or function.
- Deployment nodes can be used as input args in .bind() of other nodes in the DAG.
- Multiple nodes in the deployment graph naturally forms a DAG structure.
- A deployment node is created from
- Accessing input:
- Same input or output can be used in multiple nodes in the DAG.
- Deployment nodes can access partial user input.
- Dynamic control flow:
- A deployment node can call into other nodes in the deployment graph.
- You can use the dynamic calling to perform control flow operation that's hard to expressive in traditional DAG.
- Running a DAG:
- Nodes in the graph, such as functions or class methods, can be either sync or async.
+++
+++
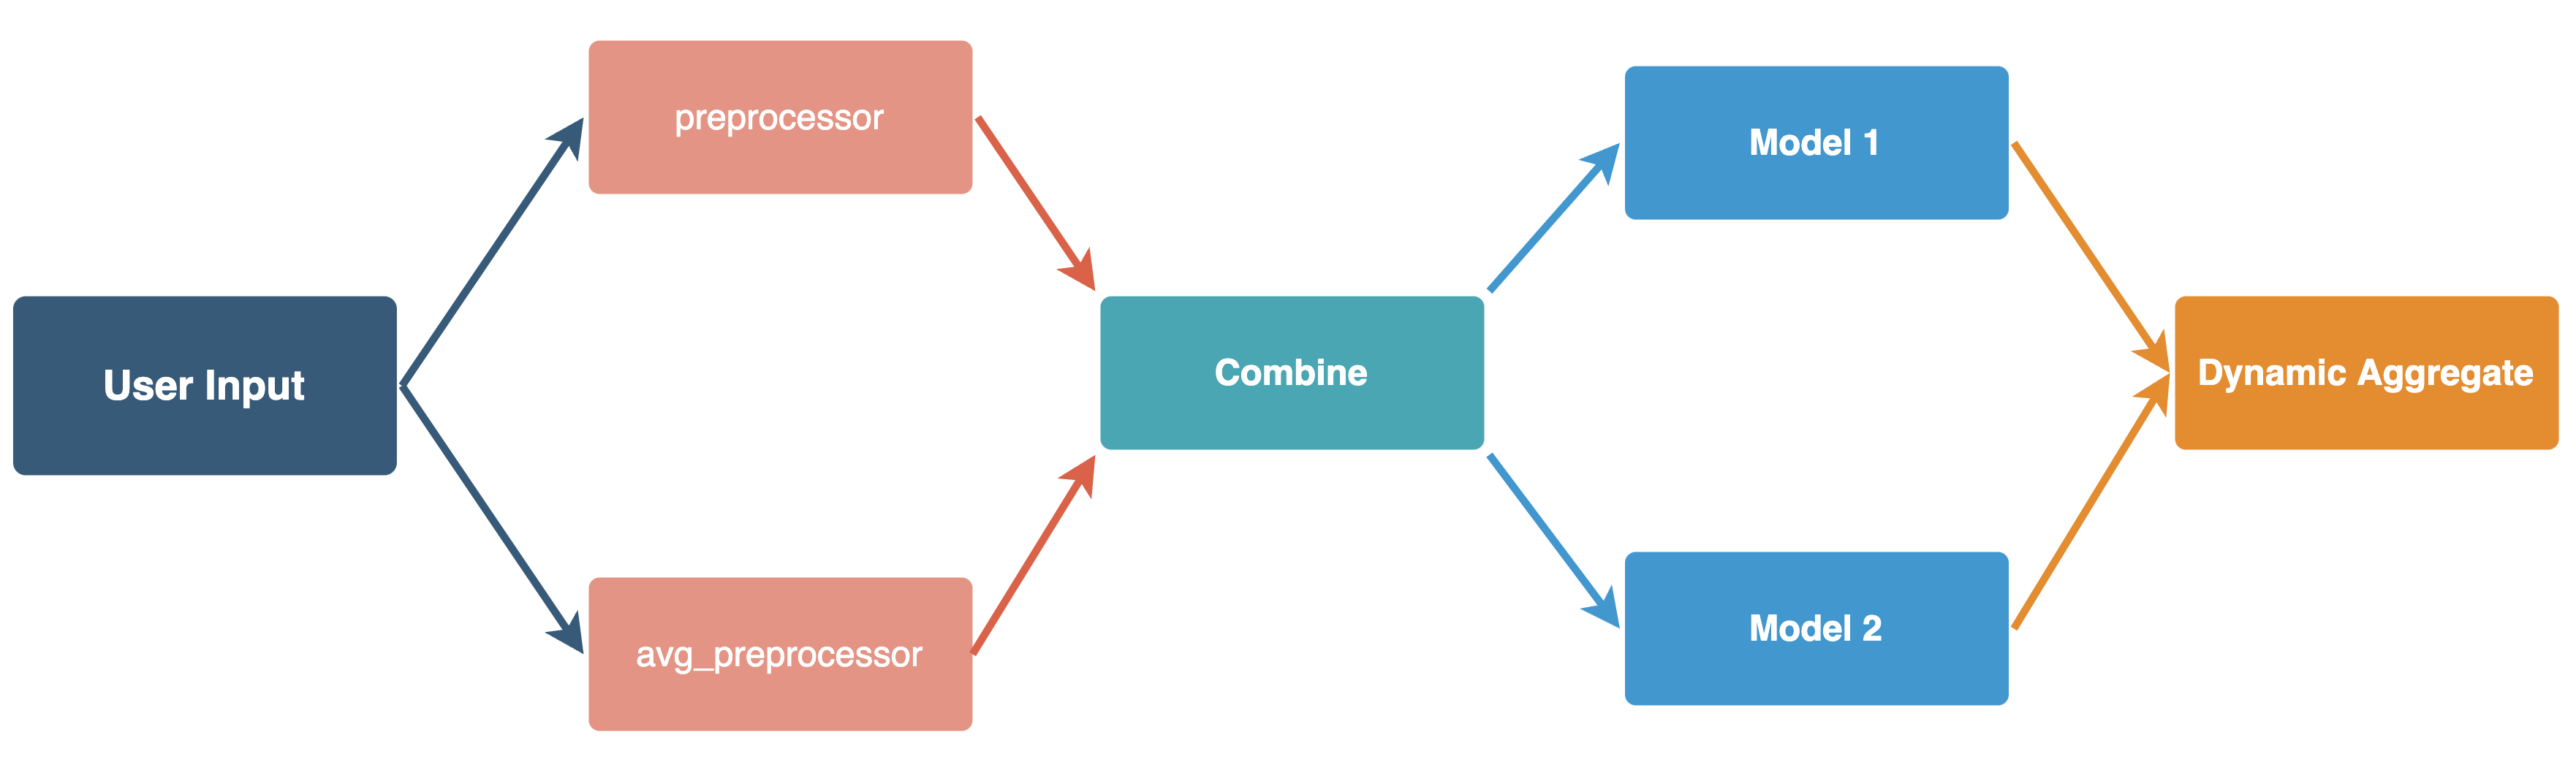
Step 1: User InputNode and preprocessor
Let's start with the first layer of DAG: Building user input to two preprocessor functions, where each function receives parts of the input data. For simplicity, we use the same existing @serve.deployment decorator on an async function body.
+++
import asyncio
from ray import serve
# We will later move Ray DAG related components
# out of experimental in later stable release
from ray.experimental.dag.input_node import InputNode

@serve.deployment
async def preprocessor(input_data: str):
    """Simple feature processing that converts str to int"""
    await asyncio.sleep(0.1) # Manual delay for blocking computation
    return int(input_data)

@serve.deployment
async def avg_preprocessor(input_data):
    """Simple feature processing that returns average of input list as float."""
    await asyncio.sleep(0.15) # Manual delay for blocking computation
    return sum(input_data) / len(input_data)

# DAG building
with InputNode() as dag_input:
    # Partial access of user input by index
    preprocessed_1 = preprocessor.bind(dag_input[0])
    preprocessed_2 = avg_preprocessor.bind(dag_input[1])
+++
There are two new APIs used in the DAG building stage: InputNode() and bind().
InputNode() : User input of the graph
InputNode is a special node in the graph that represents the user input for the graph at runtime. There can only be one for each graph, takes no arguments, and should always be created in a context manager.
It's possible to access partial inputs by index or key if every node in the graph doesn't require the full input. Example: the input consists of [Tensor_0, Tensor_1] but a single model might only need to receive Tensor_1 at rather than the full list.
bind(*args, **kwargs) : The graph building API
Once called on supported Ray-decorated function or class (@serve.deployment is fully supported, @ray.remote will be soon), generates a DeploymentNode of type DAGNode that acts as the building block of graph building.
In the example above, we can see we're using a context manager to build and bind user input:
with InputNode() as dag_input:
Which can be used and accessed by index or key in downstream calls of .bind(), such as:
preprocessed_1 = preprocessor.bind(dag_input[0])
This means we're creating a DeploymentNode called preprocessed_1 in graph building by calling .bind() on a serve decorated function, where it executes the decorated deployment function preprocessor that takes the user input at index 0 at runtime.
bind() on function
bind() on function produces a DeploymentNode that can be executed with user input.
Each deployment node used in graph is individually scalable and configurable by default. This means in real production workload where we can expect difference in compute resource and latency, we can fine tune the nodes to optimal `num_replicas` and `num_cpus` to avoid a single node being the bottleneck of your deployment graph's latency or throughput.
bind() on class constructor
Class.bind(*args, **kwargs) constructs and returns a DeploymentNode that acts as the instantiated instance of Class, where *args and **kwargs are used as init args. In our implementation, we have
m1 = Model.bind(1)
m2 = Model.bind(2)
This means we're creating two more DeploymentNode of an instance of Model that is constructed with init arg of 1 and 2, and refereced with variable name m1, m2 respectively.
bind() on class method
Once a class is bound with its init args, its class methods can be directly accessed, called or bound with other args. It has the same semantics as bind() on a function, except it acts on an instantiated DeploymentNode class instead.
+++
Step 2: Model and combiner class instantiation
After we got the preprocessed inputs, we're ready to combine them to construct request object we want to sent to two models instantiated with different initial weights. This means we need:
(1) Two Model instances in the graph instantiated with different initial weights
(2) A Combiner that refereces Model nodes for its runtime implementation by passing them as init args in .bind()
(3) The ability of Combiner to receive and merge preprocessed inputs for the same user input, even they might be produced async and received out of order.
+++
# ... previous nodes implementation skipped

@serve.deployment
class Model:
    def __init__(self, weight: int):
        self.weight = weight

    async def forward(self, input: int):
        await asyncio.sleep(0.3) # Manual delay for blocking computation
        return f"({self.weight} * {input})"


@serve.deployment
class Combiner:
    def __init__(self, m1: Model, m2: Model):
        self.m1 = m1
        self.m2 = m2

    async def run(self, req_part_1, req_part_2, operation):
        # Merge model input from two preprocessors
        req = f"({req_part_1} + {req_part_2})"

        # Submit to both m1 and m2 with same req data in parallel
        r1_ref = self.m1.forward.remote(req)
        r2_ref = self.m2.forward.remote(req)

        # Async gathering of model forward results for same request data
        rst = await asyncio.gather(*[r1_ref, r2_ref])


# DAG building
with InputNode() as dag_input:
    # Partial access of user input by index
    preprocessed_1 = preprocessor.bind(dag_input[0])
    preprocessed_2 = avg_preprocessor.bind(dag_input[1])
    m1 = Model.bind(1)
    m2 = Model.bind(2)
    combiner = Combiner.bind(m1, m2)
    dag = combiner.run.bind(preprocessed_1, preprocessed_2, dag_input[2])
+++
We are adding a few more pieces to our dag builder: bind() on class and class method, as well as passing the output of Model.bind() as init args into another class Combiner.bind()
DeploymentNode as arguments in other node's bind()
DeploymentNode can also be passed into other DeploymentNode in dag binding. In the full example below, Combiner calls into two instantiations of Model class, which can be bound and passed into Combiner's constructor as if we're passing in two regular python class instances.
m1 = Model.bind(1)
m2 = Model.bind(2)
combiner = Combiner.bind(m1, m2)
Similarly, we can also pass and bind upstream DeploymentNode results that will be resolved upon runtime to downstream DeploymentNodes, in our example, a function run() that access class method of Combiner class takes two preprocessing DeploymentNodes' output as well as part of user input that will be resolved when upstream DeploymentNode are executed.
preprocessed_1 = preprocessor.bind(dag_input[0])
preprocessed_2 = avg_preprocessor.bind(dag_input[1])
...
dag = combiner.run.bind(preprocessed_1, preprocessed_2, dag_input[2])
At runtime, calls of deployment node like ` self.m1.forward.remote()` will be automatically replaced with a `.remote()` call to the deployment handle to `self.m1`.
+++
Step 3: Dynamic aggregation based on user input
Now we have the backbone of our DAG setup: splitting and preprocessing user inputs, aggregate into new request data and send to multiple models downstream. Let's add a bit more dynamic flavor in it to demostrate deployment graph is fully python programmable by introducing control flow based on user input.
It's as simple as adding a plain if / else on combiner.run(), and from our previous binding, we get operation field at runtime from user provided input data.
dag = combiner.run.bind(preprocessed_1, preprocessed_2, dag_input[2])
+++
@serve.deployment
class Combiner:
    ...

    async def run(self, req_part_1, req_part_2, operation):
        # Merge model input from two preprocessors
        req = f"({req_part_1} + {req_part_2})"

        # Submit to both m1 and m2 with same req data in parallel
        r1_ref = self.m1.forward.remote(req)
        r2_ref = self.m2.forward.remote(req)

        # Async gathering of model forward results for same request data
        rst = await asyncio.gather(*[r1_ref, r2_ref])

        # Control flow that determines runtime behavior based on user input
        if operation == "sum":
            return f"sum({rst})"
        else:
            return f"max({rst})"
+++
Support control flow in plain python code can be very useful to build dynamic dispatcher, such as routing user request to a smaller subset of running models based on request attribute, where each model can be sharded and scaled independently.
+++
Step 4: Driver deployment to handle http ingress
Now we've built the entire serve DAG with the topology, args binding and user input. It's time to add the last piece for serve -- a Driver deployment to expose and configure http. We can configure it to start with two replicas in case the ingress of deployment becomes bottleneck of the DAG.
We expect each DAG has a driver class implementation as root, similar to the example below. This is where HTTP ingress are configured and implemented. We provide a default `DAGDriver` to handle simple HTTP parsing, but in this example we put up a custom implementation.
+++
@serve.deployment(num_replicas=2)
class DAGDriver:
    def __init__(self, dag_handle):
        self.dag_handle = dag_handle

    async def predict(self, inp):
        """Perform inference directly without HTTP."""
        return await self.dag_handle.remote(inp)

    async def __call__(self, request: starlette.requests.Request):
        """HTTP endpoint of the DAG."""
        input_data = await request.json()
        return await self.predict(input_data)

# DAG building
with InputNode() as dag_input:
    ...
    dag = combiner.run.bind(
        preprocessed_1, preprocessed_2, dag_input[2]  # Partial access of user input by index
    )

    # Each serve dag has a driver deployment as ingress that can be user provided.
    serve_dag = DAGDriver.options(route_prefix="/my-dag").bind(dag)
+++
Step 5: Test the full DAG in both python and http
We can now test and deploy the graph using serve.run:
+++
serve.run() : running the deployment graph
The deployment graph can be deployed with serve.run(). It
takes in a target DeploymentNode, and it deploys the node's deployments, as
well as all its child nodes' deployments. To deploy your graph, pass in the
root DeploymentNode into serve.run():
with InputNode() as dag_input:
    serve_dag = ...

dag_handle = serve.run(serve_dag)
serve.run() returns the passed-in node's deployment's handle. You can use
this handle to issue requests to the deployment:
ray.get(dag_handle.remote(user_input))
During development, you can also use the Serve CLI to run your deployment
graph. The CLI was included with Serve when you did pip install "ray[serve]".
The command serve run [node import path] will deploy the node and its
childrens' deployments. For example, we can remove the serve.run() calls
inside the Python script and save our example pipeline to a file called
example.py. Then we can run the driver DeploymentNode using its import path,
example.serve_dag:
$ serve run example.serve_dag
+++
The CLI expects the import path to either be a Python module on your system
or a relative import from the command line's current working directory. You can
change the directory that the CLI searches using the ```--app-dir``` flag.
The command will block on the terminal window and periodically print all the
deployments' health statuses. You can open a separate terminal window and
issue HTTP requests to your deployments
+++
$ python
>>> import requests
>>> requests.post("http://127.0.0.1:8000/my-dag", json=["1", [0, 2], "max"]).text
The CLI's serve run tool has useful flags to configure which Ray cluster
to run on, which runtime_env to use, and more. Use serve run --help to get
more info on these options.
+++
Full End to End Example Code
Now we're done! The full example below covers the full example for you to try out.
:tags: [remove-cell]

import ray
from ray import serve
from ray.serve.pipeline.generate import DeploymentNameGenerator

if ray.is_initialized():
    serve.shutdown()
    DeploymentNameGenerator.reset()
    ray.shutdown()

ray.init(num_cpus=16)
serve.start()

### Setting up clean ray cluster with serve ###
import time
import asyncio
import requests
import starlette

from ray.experimental.dag.input_node import InputNode

@serve.deployment
async def preprocessor(input_data: str):
    """Simple feature processing that converts str to int"""
    await asyncio.sleep(0.1) # Manual delay for blocking computation
    return int(input_data)

@serve.deployment
async def avg_preprocessor(input_data):
    """Simple feature processing that returns average of input list as float."""
    await asyncio.sleep(0.15) # Manual delay for blocking computation
    return sum(input_data) / len(input_data)

@serve.deployment
class Model:
    def __init__(self, weight: int):
        self.weight = weight

    async def forward(self, input: int):
        await asyncio.sleep(0.3) # Manual delay for blocking computation
        return f"({self.weight} * {input})"


@serve.deployment
class Combiner:
    def __init__(self, m1: Model, m2: Model):
        self.m1 = m1
        self.m2 = m2

    async def run(self, req_part_1, req_part_2, operation):
        # Merge model input from two preprocessors
        req = f"({req_part_1} + {req_part_2})"

        # Submit to both m1 and m2 with same req data in parallel
        r1_ref = self.m1.forward.remote(req)
        r2_ref = self.m2.forward.remote(req)

        # Async gathering of model forward results for same request data
        rst = await asyncio.gather(r1_ref, r2_ref)

        # Control flow that determines runtime behavior based on user input
        if operation == "sum":
            return f"sum({rst})"
        else:
            return f"max({rst})"

@serve.deployment(num_replicas=2)
class DAGDriver:
    def __init__(self, dag_handle):
        self.dag_handle = dag_handle

    async def predict(self, inp):
        """Perform inference directly without HTTP."""
        return await self.dag_handle.remote(inp)

    async def __call__(self, request: starlette.requests.Request):
        """HTTP endpoint of the DAG."""
        input_data = await request.json()
        return await self.predict(input_data)

# DAG building
with InputNode() as dag_input:
    # Partial access of user input by index
    preprocessed_1 = preprocessor.bind(dag_input[0])
    preprocessed_2 = avg_preprocessor.bind(dag_input[1])
    # Multiple instantiation of the same class with different args
    m1 = Model.bind(1)
    m2 = Model.bind(2)
    # Use other DeploymentNode in bind()
    combiner = Combiner.bind(m1, m2)
    # Use output of function DeploymentNode in bind()
    dag = combiner.run.bind(
        preprocessed_1, preprocessed_2, dag_input[2]
    )

    # Each serve dag has a driver deployment as ingress that can be user provided.
    serve_dag = DAGDriver.options(route_prefix="/my-dag").bind(dag)


dag_handle = serve.run(serve_dag)

# Warm up
ray.get(dag_handle.predict.remote(["0", [0, 0], "sum"]))

# Python handle
cur = time.time()
print(ray.get(dag_handle.predict.remote(["5", [1, 2], "sum"])))
print(f"Time spent: {round(time.time() - cur, 2)} secs.")
# Http endpoint
cur = time.time()
print(requests.post("http://127.0.0.1:8000/my-dag", json=["5", [1, 2], "sum"]).text)
print(f"Time spent: {round(time.time() - cur, 2)} secs.")

# Python handle
cur = time.time()
print(ray.get(dag_handle.predict.remote(["1", [0, 2], "max"])))
print(f"Time spent: {round(time.time() - cur, 2)} secs.")

# Http endpoint
cur = time.time()
print(requests.post("http://127.0.0.1:8000/my-dag", json=["1", [0, 2], "max"]).text)
print(f"Time spent: {round(time.time() - cur, 2)} secs.")
Outputs
sum(['(1 * (5 + 1.5))', '(2 * (5 + 1.5))'])
Time spent: 0.49 secs.
sum(['(1 * (5 + 1.5))', '(2 * (5 + 1.5))'])
Time spent: 0.49 secs.


max(['(1 * (1 + 1.0))', '(2 * (1 + 1.0))'])
Time spent: 0.48 secs.
max(['(1 * (1 + 1.0))', '(2 * (1 + 1.0))'])
Time spent: 0.48 secs.
Critical path for each request in the DAG is
preprocessing: max(preprocessor, avg_preprocessor) = 0.15 secs
model forward: max(m1.forward, m2.forward) = 0.3 secs
Total of 0.45 secs.
+++
Conclusion
We've walked through key concepts and a simple representative example that covers many important details we support in deployment graph building. There're still some rough edges in user experience that we're dedicated to polish in the next a few months, so please reach out to us if you have any feedback or suggestions:
- Ray Serve forum
- Github issues / feature request (tag
serve)
Potential Future improvements:
serve.build()to fulfill the Ops API so user's deployment graph can generate a YAML file for deployment, scaling and reconfiguration.- Performance optimizations:
- Tuning guide for deployment graph to avoid single node being bottleneck
- Better use of async deployment handle
- Leverage ray shared memory to reduce or eliminate intermediate data transfer
- Static compute graph transformation, fusion and placement based on profiling
- Better UX, such as visualization